GitHub repository: https://github.com/EnterFlash/ci-cd-github-firebase
CI/CD pipelines help you automate your process of testing and deployment. Uploading your application to Firebase Hosting can be as easy as pushing to your main branch in your GitHub repository.
In this tutorial, we'll be looking at how to set up a GitHub Action that builds and tests your code to later upload it securely to the Firebase cloud.
Setting up
Node & NPM To download Node.js, visit their official website here.
Firebase CLI: Once NPM is installed, to install Firebase Tools run:
$ npm install -g firebase-toolsThis will run a global installation of the package on your computer. Then, you'll be able to use it by just running the command in your terminal.
Firebase project: You can visit the Firebase Console and create a project using your Google Account.
Vue.js project: I'm going to be building and deploying a Vue.js project but this can be applied to any other framework with a bit of adjusting on the steps. You can find the sample project here.
Logging into Firebase from the CLI
To start, run the following command in your terminal to log you in to your Google account using the Firebase Tools.
$ firebase loginThen, select your Google account and let it take you back to the terminal once the authentication process is done.
Initialize Firebase Hosting in your project
To initialize firebase into our project run the command:
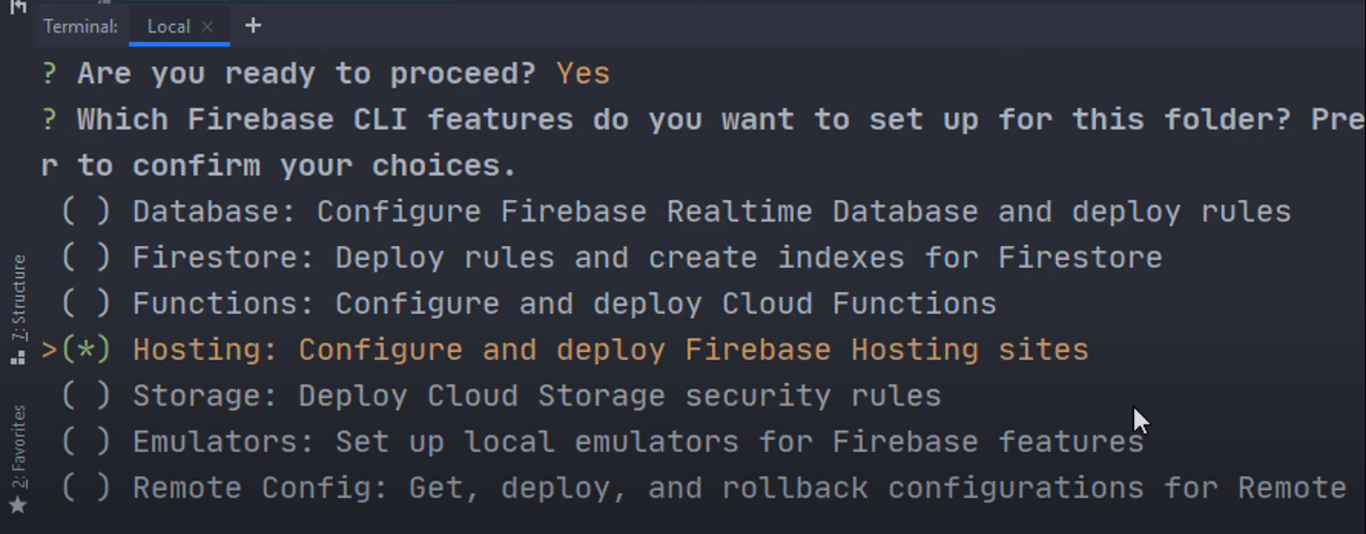
$ firebase initType Y and hit enter. Then, in the options we get, select the Hosting option that will allow you to configure and deploy your Firebase Hosting site.

Selecting the Firebase Hosting option in the CLI tools
Choose the option to select an existing project. Here we are going to pick the one we generated before in the Firebase Console.

Select the created project in the CLI tools
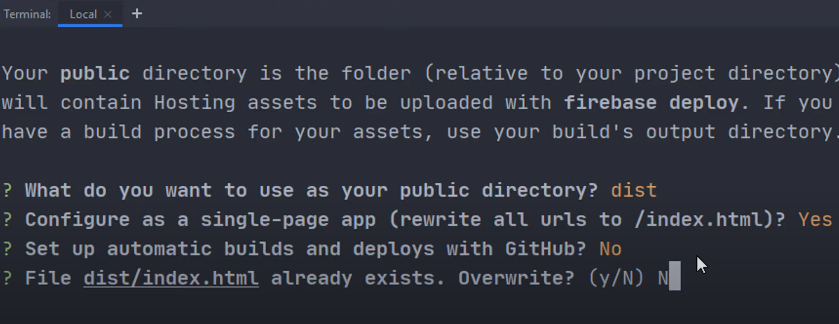
We are going to go ahead and type in dist as our public folder since this is the folder that is generated when we compile our Vue.js project.
Also, select Yes for the option to rewrite every route to the index.html (because this is a single-page app.)
Select No to automatic builds and deploys with GitHub since this is a bit different from what we are trying to do. And finally, select No to not overwrite the already existing dist/index.html file.

Final steps to initialize a Firebase project
When we finish this, we are going to have a Firebase project set up and ready for the first deployment. We are going to run the next command to manually test that our files can be uploaded successfully to Firebase Hosting.
$ firebase deploy --only hostingIf everything goes right, you should be able to access the URL linked in the Firebase Hosting section in your Firebase Console and see the compiled Vue project.
Automate deployment with a GitHub action
Now we are going to create an Action that triggers when we push to our main git branch. It will automatically build a dist folder and deploy it.
First, visit your GitHub repository. In my case that is: https://github.com/EnterFlash/ci-cd-github-firebase
Select the Actions tab and click on Create new workflow to start a new pipeline from scratch.
This will create a file in your repository called main.yml stored in .github/workflows, which is the folder where GitHub automatically takes every YML file and reads it to create a workflow by following the instructions and steps set in each file.
As we mentioned before, we want to build, test and deploy the Vue.js in the repository, so in my case these are the steps I'm using:
# .github/workflows/main.ymlname: Build and deployon: push: branches: [ main ] # Run workflow manually workflow_dispatch:jobs: build: name: Build runs-on: ubuntu-latest steps: - name: Checkout repository uses: actions/checkout@main - name: Install dependencies run: npm ci - name: Build dependencies run: npm run build - name: Archive production artifact uses: actions/upload-artifact@main with: name: dist path: dist deploy: name: Deploy needs: build runs-on: ubuntu-latest steps: - name: Checkout repository uses: actions/checkout@main - name: Download artifact uses: actions/download-artifact@main with: name: dist path: dist - name: Deploy to Firebase uses: w9jds/firebase-action@master with: args: deploy --only hosting env: FIREBASE_TOKEN: ${ secrets.FIREBASE_SECRET }}If we follow the file from top to bottom, what it does is first set a trigger to run on every push to the main branch or by manually dispatching the workflow.
Next, we have the jobs section where there are two jobs; the build job and the deploy job.
For the build job, we have four steps that install dependencies and build the final product into a GitHub artifact, which is just a packaged version of our build that allows us to share the result between jobs. Also, in this build job you could add another step to test in case we were using a testing framework like Jest but I'm not going to do it.
In the deploy job, you'll see there are 3 steps. The first two are just used to download the artifact created in the previous step. The third one, however, uses a custom action called w9jds/firebase-action@master that will allow us to deploy to Firebase Hosting by inserting only a Firebase CI secret.
The FIREBASE_SECRET is a constant stored in the GitHub repository secrets. You will have to run the following command and log in with the corresponding Google Account:
$ firebase login:ciOnce you authenticate a secret token will be received like this:

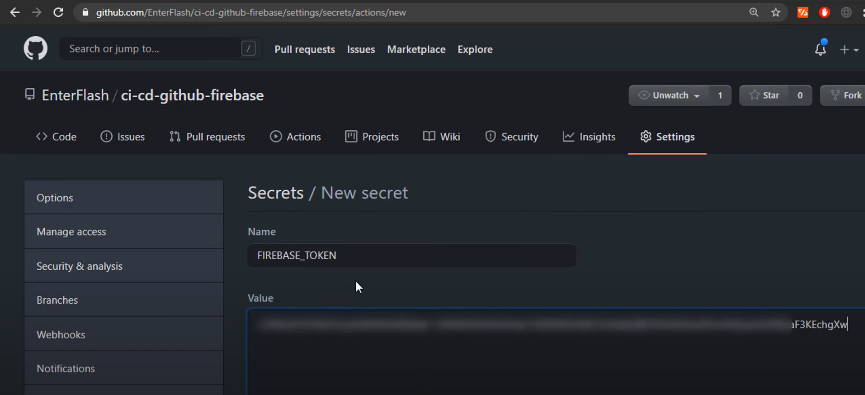
This token should then be stored in the secrets by going to your repository Settings > Secrets and adding a new Secret with the name of FIREBASE_TOKEN as you can see in the next image.

Firebase token added into GitHub secrets
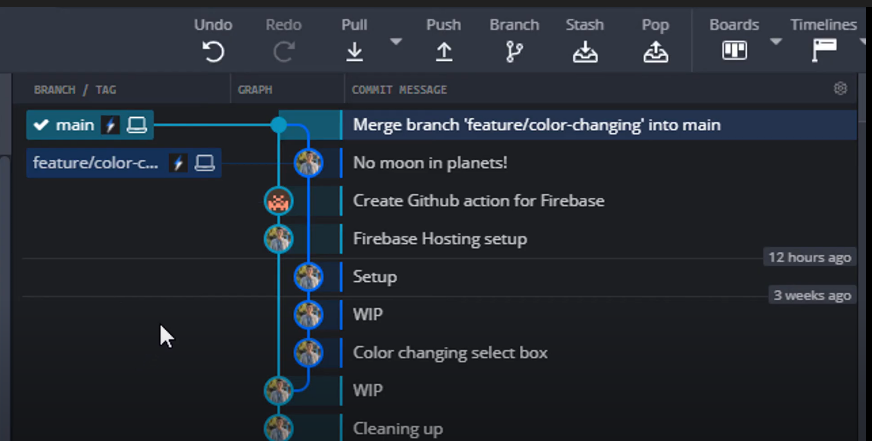
Now that everything is set up let's test it out by merging a secondary branch into our main branch and pushing it to GitHub.

Merging and pushing using GitKraken
I've been asked before what this Git GUI is and that's GitKraken. You can use my referral code to download GitKraken https://www.gitkraken.com/invite/c4SJ1sK3 and even get a chance to win a $100 Amazon Gift Card!
Once we push if you go to the Actions tab, you'll see a new workflow running and deploying your application to the cloud. 😁